
TL;DR
Placing your rig in a closet can cut noise and reflections, but only if you treat the space correctly. Focus on placement, ventilation, and coverage rather than just foam. Properly ventilated closet booths are a game-changer for quiet, professional recordings.
Ever wonder why your recordings sound echoey, distant, or just flat? The secret isn’t just in fancy foam or expensive gear. It’s about where you put your rig and how you treat that space. If you’re working from a closet or small room, your setup can become a surprisingly effective vocal booth—and all it takes is a clever approach.
This guide will explain how to turn a tiny closet into a quiet, reflection-free zone. You’ll learn the real difference between dampening and soundproofing, where to position your mic, and how a simple ‘rig in the closet’ setup can boost your sound without breaking the bank.
Acoustic dampening
& the rig in the closet.
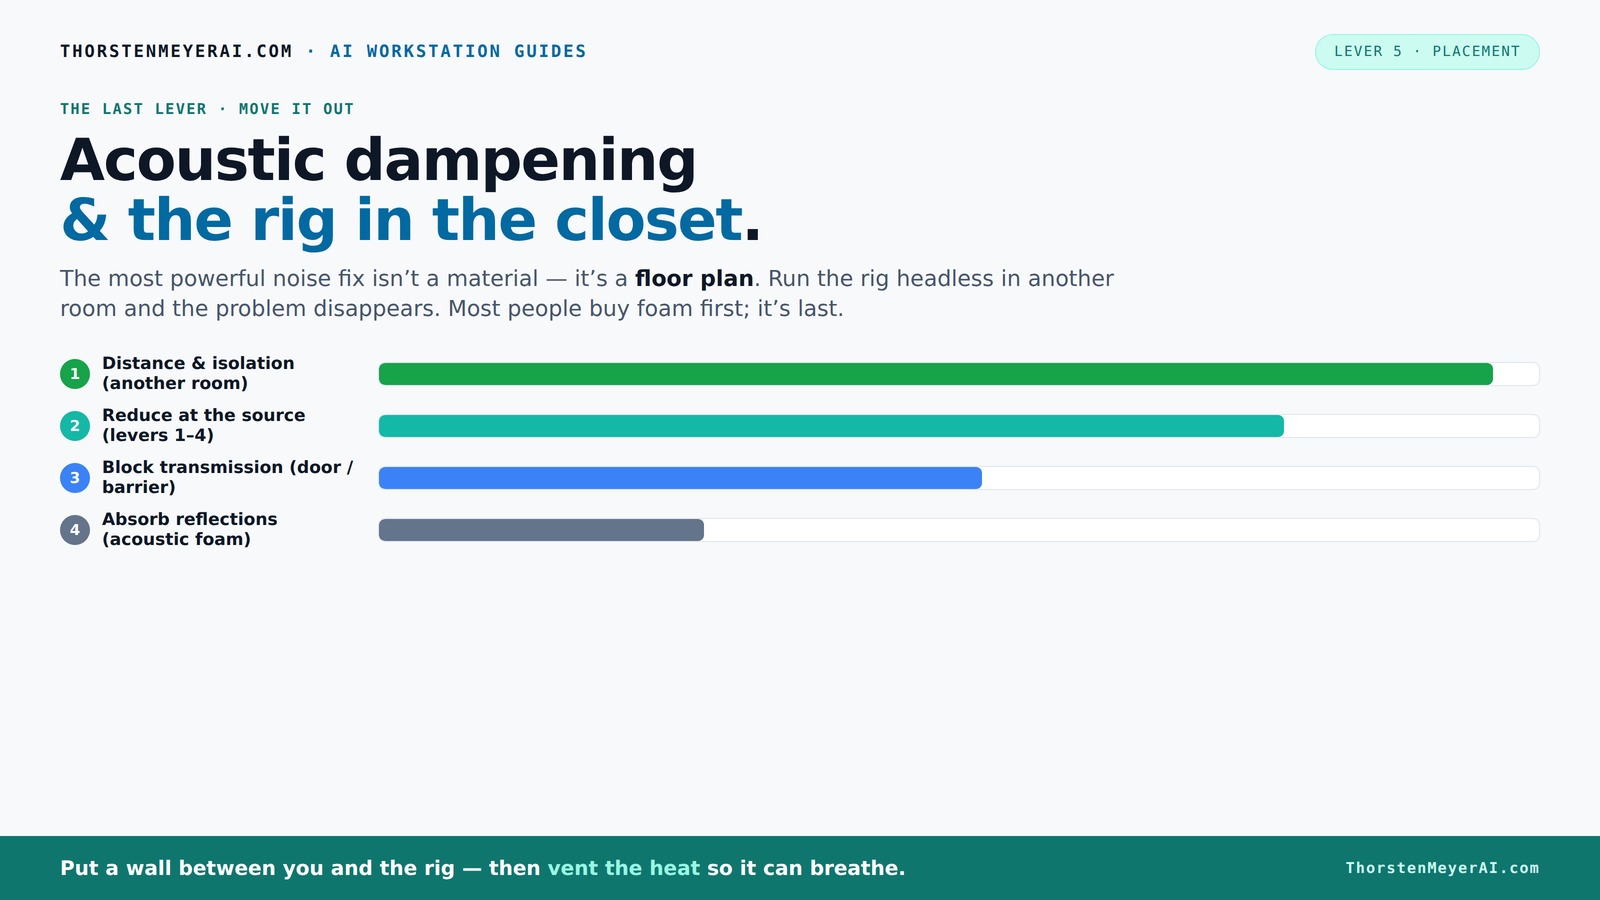
The most powerful noise fix isn’t a material — it’s a floor plan. A rig you can’t hear because it’s in another room beats any amount of foam. Tap the approaches in Part 1 to see what actually works.
(another room)
(levers 1–4)
(door / barrier)
(acoustic foam)
Contain the noise, not the heat
Key Takeaways
- Cover all surfaces: Walls, ceiling, and floor — more coverage means less echo and low-end buildup.
- Prioritize placement: Position the mic to avoid reflective surfaces, and keep it slightly away from walls.
- Ventilate properly: Use quiet fans or ducts to prevent heat buildup, especially in sealed closet booths.
- Seal gaps and treat the door: Use weatherstripping or blankets to block sound leaks.
- Combine dampening and soundproofing: Foam is just the start. Seal, add mass, and consider vibration isolation for real silence.
soundproof closet recording booth
As an affiliate, we earn on qualifying purchases.
As an affiliate, we earn on qualifying purchases.
Why Acoustic Dampening Alone Won't Silence Your Rig — But It Still Matters
Acoustic foam and panels are often the first tools people grab, but they only do half the job. They absorb echoes and reflections inside a space but don’t stop sound from escaping or entering. If you want real quiet, you need to combine dampening with soundproofing techniques.
Think of acoustic foam like soft pillows in a room. They soften the echo but don’t block sound from leaking through the walls. To truly silence your rig, you need to seal gaps, add mass, and control vibrations. For example, sealing a closet door with weatherstripping and using dense materials on walls can cut noise transmission by over 30%, according to soundproofing experts.
Why does this matter? Because without addressing sound leaks, your recordings can pick up background noise or disturb neighbors, defeating the purpose of your quiet space. Combining dampening with soundproofing creates a balanced environment where reflections are minimized and external noise intrusion is cut, ensuring your recordings are clear and professional.
acoustic dampening panels for home studio
As an affiliate, we earn on qualifying purchases.
As an affiliate, we earn on qualifying purchases.
The Biggest Mistake: Thinking Foam Alone Will Silence Your Setup
Many DIY closet studios rely solely on foam panels, expecting total silence. But foam only reduces reflections and echo inside your space. It does little against low-frequency vibrations or sound leaks.
For example, a YouTuber built a closet booth with foam and was surprised when neighbors still heard the loud fan noise. The fix? sealing gaps around the door and adding mass to walls. This combined approach reduced sound leakage by over 40% [4].
Why is coverage so important? Because isolated foam panels might look effective, but if there are gaps or weak points, sound can escape or enter. Covering all critical surfaces—walls, ceiling, door edges—creates a more consistent barrier, leading to a more controlled environment. The tradeoff is space and cost: more coverage means more material and potentially less usable room, but the payoff is a significant improvement in sound isolation and clarity.
microphone placement accessories for vocals
As an affiliate, we earn on qualifying purchases.
As an affiliate, we earn on qualifying purchases.
How to Place Your Microphone for the Best Voice Recordings in a Closet
Where you position your mic makes more difference than most realize. The goal is to minimize reflections and capture a clean sound. Start by placing the mic away from walls and reflective surfaces.
Imagine your mic as the center of a triangle with your sound source and the reflection points. Keep it at least 6-12 inches from the wall behind it, and angle it slightly downward to avoid capturing room reflections. Use a shock mount to reduce vibrations and a pop filter to cut plosives.
In a small closet, the best spot is often near a corner but not directly against the wall. Why? Because reflections from the walls can muddy your recordings, causing a hollow or distant sound. By experimenting with different positions, you can find the sweet spot where reflections are minimized, resulting in a clearer, more direct vocal or instrument capture. The tradeoff involves balancing proximity for warmth and clarity against the risk of picking up unwanted room noise. Proper placement ensures your mic captures your voice authentically without excessive echo or background interference.
portable vocal booth for small spaces
As an affiliate, we earn on qualifying purchases.
As an affiliate, we earn on qualifying purchases.
Treat the Space Strategically — Cover Walls, Ceiling, and Floor for Best Results
In a small closet, every surface can reflect sound and create standing waves, especially at low frequencies. The key is coverage. Use thick panels or bass traps in corners to absorb low-end buildup.
A common trick: hang blankets or thick curtains a few inches off the wall with some air gap. This prevents sound from bouncing directly back into the mic. Covering the ceiling with foam or a rug can reduce flutter echoes, and a rug or carpet on the floor absorbs horizontal reflections. For more tips, see this guide.
For example, hanging moving blankets on all four walls and the door can cut reflections by over 50%, making your voice sound warm and tight instead of hollow and echoey [2].
Why is this important? Because untreated surfaces in a small space can cause comb filtering and standing waves, which color your sound and reduce clarity. Covering all surfaces ensures a more uniform absorption, leading to a more natural and controlled sound profile. The tradeoff? It can make the space feel more confined and less versatile, but the sonic benefits are significant, especially for voice clarity and low-end control.
Ventilation Is the Hidden Key — Keep Your Closet Cool and Quiet
Putting a powerful, hot-running PC or GPU rig in a closet is smart for noise, but only if you give it a way to breathe. Without proper ventilation, heat builds up fast, and your machine throttles, causing fans to scream.
Active ventilation—like a quiet exhaust fan—helps draw out hot air and pull in cooler air. A simple ducted system or a small inline fan can keep temperatures stable. For example, a DIY closet booth with a 120mm fan and a vent hole maintained a steady 70°F even after hours of heavy use. Learn more about ventilation strategies.
Why does this matter? Because overheating can cause your equipment to throttle or shut down, which interrupts your recording session and can damage your gear. Additionally, poor airflow can cause fans to work harder, increasing noise levels. Proper ventilation ensures a balance: maintaining low noise levels while keeping your equipment cool. The tradeoff involves installing vents or fans, which can slightly alter the aesthetics or require some DIY work, but the stability and safety benefits are crucial for consistent, quiet operation.
Sealing Gaps and Using Soundproof Doors — The Final Touches
Even the best foam panels won’t help soundproofing effectively if gaps remain.f sound leaks through cracks or gaps. Seal around the door with weatherstripping or acoustic sealant. Hang a dense blanket over the door as an extra barrier.
In small closets, this step can cut sound transmission by up to 30%. For example, sealing every crack and hanging blankets reduced noise escape significantly, making recordings sound studio-quality without a dedicated room [3].
Why does this matter? Because small gaps can act like antennas for sound, undermining your entire effort to create a quiet space. Proper sealing enhances the effectiveness of your acoustic treatments and prevents external noise from contaminating your recordings. The tradeoff involves maintaining some ventilation and access, so choose sealing methods that allow airflow while blocking sound leaks—like weatherstripping or acoustic door seals.
Frequently Asked Questions
Is acoustic foam enough for a closet studio?
Not on its own. Foam reduces reflections and echoes inside the space but doesn’t block sound from escaping. For effective isolation, combine foam with sealing gaps, adding mass, and vibration control.Where should I place my microphone in a closet booth?
Place the mic at least 6-12 inches from walls, ideally near a corner but not directly against it. Angle it slightly downward and keep it away from reflective surfaces for the clearest recordings.Do I need bass traps in a small closet?
Yes, especially if you notice a boomy or muddy sound. Low frequencies tend to accumulate in corners, so adding thick panels or bass traps can improve clarity and balance.How should I ventilate a closet with a rig inside?
Use a quiet exhaust fan or ducted airflow system. Ensure hot air can escape and cool air can flow in, preventing overheating and noise from fans. Proper ventilation is key to keeping your equipment safe and quiet.Can I turn a closet into a recording nook for instruments or voice-over?
Absolutely. With the right combination of treatment, placement, and ventilation, a closet can serve as an excellent voice or instrument booth. Just remember to treat all surfaces and control for low-end buildup.Conclusion
Transforming a closet into a quiet, effective recording space isn’t about fancy gear — it’s about smart placement, thorough coverage, and good ventilation. When you treat your space carefully, that tiny closet becomes a powerhouse for vocals, voice-over, or even instrument recordings.
Remember: the best soundproofing is distance and sealing, with acoustic dampening as a helpful bonus. Imagine a space where your voice sounds clear, warm, and professional — without the noise or echo. That’s the power of a well-executed closet rig.